Automate Project Setup with Angular Schematics
So, it’s 2025, and as I write this article, Google is already working on Angular 20.
Despite the groundbreaking improvements in the latest releases, there’s still one crucial area that, in my opinion, remains overlooked: the documentation and adoption of Angular Schematics.
Angular Schematics is a powerful tool which I previously talked about in one of my recent post. However, its poor documentation and steep learning curve are among the main reasons why it is still not widely known for many Angular developers.
Today, I want to do something fun and share my experience with this tool, which has been instrumental in automating workflows and code in my projects. So, let’s keep it quick and practical! We’ll explore three schematic functionalities that can accelerate project setups and save valuable time in our daily work.

1- Generate a Base Folder Structure
One simple feature than can add value to our daily routine is project scaffolding. As developers, we often adopt methodologies and structures to build different projects.
A great way to boost our productivity is by creating a schematic function that generates a project structure based on our preferences. This is not different from what Angular CLI or NX do. In fact, guess what, both tools use Angular Schematics. The only difference is that in the following example we will create everything from scratch.
First, we need to create an Angular workspace. You can use Angular CLI, for simplicity, set it up manually — just make sure to include these necessary dependencies:
{
  "name": "angular-helper",
  "version": "1.0.0",
  "description": "Custom Angular Schematics",
  "main": "dist/generate-folder-structure/index.js",
  "schematics": "./src/collection.json",
  "scripts": {
    "build": "tsc",
    "test": "echo \"Error: no test specified\" && exit 1"
  },
  "keywords": [],
  "author": "",
  "license": "ISC",
  "devDependencies": {
    "@angular-devkit/schematics": "^19.1.7",
    "@angular-devkit/schematics-cli": "^19.1.7",
    "typescript": "^5.7.3"
  }
}
The next step, involes creating the collection and schema files, which are essential for building an Angular Schematic:
{
  "$schema": "../node_modules/@angular-devkit/schematics/collection-schema.json",
  "schematics": {
    "generate-folder-structure": {
      "description": "Generate a base folder structure for Angular projects",
      "factory": "../dist/generate-folder-structure/index.js#angularHelperSchematic",
      "schema": "./generate-folder-structure/schema.json"
    }
  }
}
{
"$schema": "http://json-schema.org/schema",
"$id": "generate-folder-structure",
"title": "Angular Helper",
"type": "object",
"properties": {
}
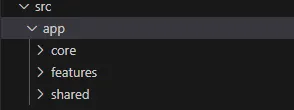
}Last, but not least, the functionality, in this example three different folders are created under /src/app: core, shared and features.
export function angularHelperSchematic(options: Schema): Rule {
  return (tree: Tree, context: SchematicContext) => {

    const folders = ['src/app/core', 'src/app/shared', 'src/app/features'];
    folders.forEach((folder) => {
      if (!tree.exists(folder)) {
        tree.create(`${folder}/.gitkeep`, '');
      }
    });

    return tree;
  };
}
You can customized your function as you like, just be sure to return the Angular tree at the end of the function.
And, that’s all!
In order to test our example, we will need to execute the following commands:
npm run buildschematics .:generate-folder-structure --dry-run=falseAnd it’s done:
Please note that this example is configured to run locally. However, Angular Schematic can be published or customized according to your needs.
2- Configure ESLint and Prettier
After structuring an Angular project, it’s common to add some essential dependencies. In my experience, ESLint and Prettier are must-have tools that I always install…
So, why not automate these installations?
In this example, we will configure the installation of ESLint and Prettier through the properties schema configuration. This approach enhances flexibility by defining clear types and structures, making our schematic easier to maintain.
Additionally, we can make this functionality optional during the schematic execution. This can be particularly useful if we want to add more flexibility to our schematics or if we plan to develop this tool for a broader group of developers within our ecosystem.
First, schema.json must be updated:
{
  "$schema": "http://json-schema.org/schema",
  "$id": "generate-folder-structure",
  "title": "Angular Helper",
  "type": "object",
  "properties": {
    "eslint": {
      "type": "boolean",
      "description": "Configure ESLint and Prettier",
      "x-prompt": "Do you want to configure ESLint and Prettier?",
      "default": false
    }
  }
}
Secondly, the functionality:
import { Rule, SchematicContext, Tree } from '@angular-devkit/schematics';
import { NodePackageInstallTask } from '@angular-devkit/schematics/tasks';

export interface Schema{
  eslint: boolean;
}

function setupEslintPrettier(tree: Tree, context: SchematicContext): void {
  context.addTask(new NodePackageInstallTask({
    packageName: 'eslint prettier eslint-config-prettier eslint-plugin-prettier husky lint-staged'
  }));

  const eslintConfig = {
    "extends": ["eslint:recommended", "plugin:@typescript-eslint/recommended", "prettier"],
    "plugins": ["@typescript-eslint", "prettier"],
    "rules": {
      "prettier/prettier": "error"
    }
  };

  const prettierConfig = {
    "singleQuote": true,
    "trailingComma": "all"
  };


  const lintStagedConfig = {
    "*.{js,ts,tsx,css,md}": ["prettier --write", "git add"]
  };

  tree.create('.eslintrc.json', JSON.stringify(eslintConfig, null, 2));
  tree.create('.prettierrc', JSON.stringify(prettierConfig, null, 2));
  tree.create('.lintstagedrc', JSON.stringify(lintStagedConfig, null, 2));
}

export function angularHelperSchematic(options: Schema): Rule {
  return (tree: Tree, context: SchematicContext) => {

    const folders = ['src/app/core', 'src/app/shared', 'src/app/features'];
    folders.forEach((folder) => {
      if (!tree.exists(folder)) {
        tree.create(`${folder}/.gitkeep`, '');
      }
    });

    if (options.eslint) {
      setupEslintPrettier(tree, context);
    }

    return tree;
  };
}
Easy enough, isn’t it?
After building and executing the schematic, you can review your new x-prompt configuration:

Final Exercise — Unlocking More Potential
With the previous examples, you’ve seen how to scaffold a project and automate dependency installations. Let’s explore another powerful functionality of Schematics: automating the creation of configuration files.
There are many ways to achieve this, but to keep things simple, let’s look at a quick example — generating a basic .editorconfig file for our project.
First things first, schema.json needs to be updated:
{
  "$schema": "http://json-schema.org/schema",
  "$id": "generate-folder-structure",
  "title": "Angular Helper",
  "type": "object",
  "properties": {
    "eslint": {
      "type": "boolean",
      "description": "Configure ESLint and Prettier",
      "x-prompt": "Do you want to configure ESLint and Prettier?",
      "default": false
    },
    "editor": {
      "type": "boolean",
      "description": "Configuration of Editor Config",
      "x-prompt": "Do you want to configure an Editor Configuration?",
      "default": false
    }
  }
}
Secondly… yes, you guessed it right: Functionality!
import { Rule, SchematicContext, Tree } from '@angular-devkit/schematics';
import { NodePackageInstallTask } from '@angular-devkit/schematics/tasks';

export interface Schema{
  editor: boolean;
  eslint: boolean;
}

function setupEslintPrettier(tree: Tree, context: SchematicContext): void {
  context.addTask(new NodePackageInstallTask({
    packageName: 'eslint prettier eslint-config-prettier eslint-plugin-prettier'
  }));

  const eslintConfig = {
    "extends": ["eslint:recommended", "plugin:@typescript-eslint/recommended", "prettier"],
    "plugins": ["@typescript-eslint", "prettier"],
    "rules": {
      "prettier/prettier": "error"
    }
  };

  const prettierConfig = {
    "singleQuote": true,
    "trailingComma": "all"
  };


  const lintStagedConfig = {
    "*.{js,ts,tsx,css,md}": ["prettier --write", "git add"]
  };

  tree.create('.eslintrc.json', JSON.stringify(eslintConfig, null, 2));
  tree.create('.prettierrc', JSON.stringify(prettierConfig, null, 2));
  tree.create('.lintstagedrc', JSON.stringify(lintStagedConfig, null, 2));
}

export function angularHelperSchematic(options: Schema): Rule {
  return (tree: Tree, context: SchematicContext) => {

    const folders = ['src/app/core', 'src/app/shared', 'src/app/features'];
    folders.forEach((folder) => {
      if (!tree.exists(folder)) {
        tree.create(`${folder}/.gitkeep`, '');
      }
    });

    if (options.eslint) {
      setupEslintPrettier(tree, context);
    }

    if(options.editor){
      const editorConfig = `
      # EditorConfig is awesome: https://EditorConfig.org

      # top-most EditorConfig file
      root = true

      [*]
      charset = utf-8
      end_of_line = lf
      indent_style = space
      indent_size = 2
      trim_trailing_whitespace = true
      insert_final_newline = true

      [*.{js,ts,json,css,html}]
      indent_size = 2
      `;

      if (!tree.exists('.editorconfig')) {
        tree.create('.editorconfig', editorConfig);
        context.logger.info('.editorconfig generated!');
      } else {
        context.logger.info('.editorconfig already exists.');
      }
    }

    return tree;
  };
}
Please, note that context logger function is used in order to trace any problem during installation.
If we configured everything properly, we should see an additional step to configure after bulding and executing our schematic:

Et, voilà!
Bibliography
I’m sharing the sample repository I created to write this article in case anyone finds it helpful.
Additionally, here are two awesome content creators if you want to learn more about Angular Schematics:
~Jesús Sanz