Optimize and Take Your Angular Libraries to the Next Level

Building and optimizing Angular libraries can feel like navigating uncharted territory. Over the past few years, I’ve had the opportunity to work on multiple Angular library projects. While the experience has been rewarding, it’s also been challenging — in my personal opinion, this is a highly niche area with vague and often abstract resources available online. The official Angular documentation dedicates just a single page to libraries, and the examples provided, while helpful, often lack real-world applicability.
Recently, I’ve been focusing on learning optimization techniques to enhance the scalability of complex Angular ecosystems. Unsurprisingly, this has been just as challenging. While the documentation and resources have improved compared to a few years ago, truly useful articles are still rare. Many examples are drawn from massive solutions like Spartacus, Kendo UI, or Angular itself, which can feel daunting for smaller-scale projects or individual developers.
This article aims to bridge that gap. Whether you’re an experience developer or someone just stepping into Angular library development, I’ll try my best to provide clear and practical guidance on the essential aspects of library optimization. The focus will be on techniques that make your libraries scalable and maintainable, even in the face of increasing complexity.
Use The Power Of PeerDependencies!
One of Angular’s fundamental features for structuring projects is managing dependencies effectively through the package.json file. While this may seem straightforward, many Angular developers struggle to fully grasp the nuances of the three key dependency declarations: dependencies, devDependencies, and peerDependencies.
From my point of view, understanding these distinctions is critical for library developers, as improper declarations can lead to confusion, version conflicts, or poor usability for consumers.
For library developers, the correct use of peerDependencies is especially crucial. Peer dependencies are not installed directly by your library; instead, they are expected to be installed by the consuming project. This approach ensures that the consuming project has control over the versions of shared dependencies, preventing duplicate installations or version mismatches between the library and the consumer application.
Let’s take a look at two difference examples to quickly overview the differences between an optimized library and a bad structured library:
{
  "name": "basic-library",
  "version": "0.0.1",
  "peerDependencies": {
    "@angular/common": "^18.2.0",
    "@angular/core": "^18.2.0",
    "@angular/forms": "^18.2.0",
    "@angular/material": "^18.2.11",
    "@angular/platform-browser": "^18.2.0",
    "@angular/platform-browser-dynamic": "^18.2.0",
    "rxjs": "~7.8.0"
  },
  "dependencies": {
    "tslib": "^2.3.0"
  },
  "allowedNonPeerDependencies": {
    "zone.js": "~0.14.10"
  },
  "sideEffects": false
}
{
"name": "optimized-library",
"version": "0.0.1",
"peerDependencies": {
"@angular/animations": "^18.2.0",
"@angular/cdk": "^18.2.11",
"@angular/common": "^18.2.0",
"@angular/core": "^18.2.0",
"@angular/forms": "^18.2.0",
"@angular/material": "^18.2.11",
"@angular/platform-browser": "^18.2.0",
"@angular/platform-browser-dynamic": "^18.2.0",
"rxjs": "~7.8.0",
"zone.js": "~0.14.10"
},
"dependencies": {
"tslib": "^2.3.0"
}
}Both examples present a similar library with the same dependencies and functionalities. Although the first example does not declare all the required dependencies and uses the allowedNonPeerDependencies declaration. By structuring your library’s dependencies thoughtfully — especially leveraging peerDependencies where appropriate—you ensure that your library is both scalable and developer-friendly. This small but significant consideration can make the difference between a library that’s seamless to use and one that’s riddled with headaches.
Design Tree-Shakable Code
The term tree-shakable refers to the ability of a class, service, or component to be automatically removed during the compilation process if it is not used. Failing to design your code to be tree-shakable can unintentionally force future consumers of your library to include unnecessary code, increasing the size of their final bundle.
To prevent this, it’s essential to write tree-shakable code. Fortunately, Angular provides several techniques to achieve this and you can find different examples on the Internet. Let’s review one example with a Tree-Shakable service.
Non Tree-Shakable service
@Component({
  selector: 'basic-product-list',
  standalone: true,
  imports: [CommonModule, MatTableModule],
  templateUrl: './product-list.component.html',
  styleUrls: ['./product-list.component.scss'],
  providers: [ProductService]
})
export class ProductListComponent implements OnInit {
  displayedColumns: string[] = ['id', 'name', 'price', 'description'];
  dataSource: Product[] = [];

  constructor(private productService: ProductService) {}
}@Injectable()
export class ProductService {
private products: Product[] = [
{ id: 1, name: 'Product A', price: 29.99, description: 'High quality product A' },
{ id: 2, name: 'Product B', price: 19.99, description: 'Reliable product B' },
{ id: 3, name: 'Product C', price: 39.99, description: 'Popular product C' },
];
getProducts(): Observable<Product[]> {
return of([]);
}
}Tree-Shakable service
@Component({
  selector: 'optimized-product-list',
  standalone: true,
  imports: [CommonModule, MatTableModule],
  templateUrl: './product-list.component.html',
  styleUrls: ['./product-list.component.scss']
})
export class ProductListComponent implements OnInit, AfterContentInit {
  displayedColumns: string[] = ['id', 'name', 'price', 'description'];
  dataSource: Product[] = [];

private productService = inject(ProductService);@Injectable({
providedIn: 'root',
})
export class ProductService {
private products: Product[] = [
{ id: 1, name: 'Product A', price: 29.99, description: 'High quality product A' },
{ id: 2, name: 'Product B', price: 19.99, description: 'Reliable product B' },
{ id: 3, name: 'Product C', price: 39.99, description: 'Popular product C' },
];
getProducts(): Observable<Product[]> {
return of([]);
}
}- By using providedIn: ‘root’ in the second example, Angular can eliminate unused services during the tree-shaking process, reducing the bundle size.
- Using inject enables direct and simplified dependency injection within components.
- Providing services at the root level ensures there is only one instance of the service throughout the application, improving performance and reducing memory usage.
Using Lightweight Token Methodology
Before diving into building and optimizing libraries, I must admit that I wasn’t familiar with the Lightweight Token Methodology. To be honest, there aren’t many examples available online, apart from the one provided in the official Angular Documentation.
While it may take some time to fully grasp, I believe the Lightweight Token Methodology has the potential to be a game-changer for library developers aiming to elevate their code. It’s a powerful technique that, when applied correctly, can significantly improve flexibility and maintainability.
To better illustrate this concept, let’s walk through a simplified example. We’ll start, as mentioned earlier, with a general case implementing an optional component: NoProductsMessageComponent.
@Component({
  selector: 'basic-no-products-message',
  standalone: true,
  imports: [CommonModule],
  template: `<p>No products available.</p>`
})
export class NoProductsMessageComponent {
  showNoProductsMessage(): void {
    console.log('No products available.');
  }
}@Component({
selector: 'basic-product-list',
standalone: true,
imports: [CommonModule, MatTableModule],
templateUrl: './product-list.component.html',
styleUrls: ['./product-list.component.scss'],
providers: [ProductService]
})
export class ProductListComponent implements OnInit {
displayedColumns: string[] = ['id', 'name', 'price', 'description'];
dataSource: Product[] = [];
@ContentChild(NoProductsMessageComponent) noProductsMessage: NoProductsMessageComponent | null = null;
constructor(private productService: ProductService) {}
ngOnInit(): void {
this.productService.getProducts().subscribe((products) => {
this.dataSource = products;
if (this.dataSource.length === 0 && this.noProductsMessage) {
this.noProductsMessage.showNoProductsMessage();
}
});
}
ngAfterContentInit(): void {
if (this.dataSource.length === 0 && this.noProductsMessage) {
this.noProductsMessage.showNoProductsMessage();
}
}
}In these images, we see an example of the NoProductsMessageComponent being applied to the ProductListComponent.
Following this logic, if a consumer application doesn’t make use of the ContentChild, it might seem unnecessary to include the NoProductsMessageComponent to the compilated code. In other words, it would be reasonable to assume that this functionality is tree-shakable, correct? ;)
Unfortunately, this is not the case. This is because the variable actually contains two references to the ProductListComponent: one in the type position and another in the value position.
@ContentChild(NoProductsMessageComponent) noProductsMessage: NoProductsMessageComponent | null = null;While the TypeScript compiler removes the type position during the conversion to JavaScript, the value position remains and is referenced at runtime. This behavior prevents the component from being tree-shaken.
So, what can we do to address this issue? Let’s review an example from an optimized library to see how this can be resolved:
@Component({
  selector: 'optimized-no-products-message',
  standalone: true,
  imports: [CommonModule],
  template: `<p>No products available.</p>`,
  providers: [
    { provide: ProductListToken, useExisting: NoProductsMessageComponent }
  ]
})
export class NoProductsMessageComponent extends ProductListToken {
  showNoProductsMessage(): void {
    console.log('No products available.');
  }
}@Component({
selector: 'optimized-product-list',
standalone: true,
imports: [CommonModule, MatTableModule],
templateUrl: './product-list.component.html',
styleUrls: ['./product-list.component.scss']
})
export class ProductListComponent implements OnInit, AfterContentInit {
displayedColumns: string[] = ['id', 'name', 'price', 'description'];
dataSource: Product[] = [];
private productService = inject(ProductService);
@ContentChild(ProductListToken) noProductsMessage: ProductListToken | null = null;
ngOnInit(): void {
this.productService.getProducts().subscribe((products) => {
this.dataSource = products;
if (this.dataSource.length === 0 && this.noProductsMessage) {
this.noProductsMessage.showNoProductsMessage();
}
});
}
ngAfterContentInit(): void {
if (this.dataSource.length === 0 && this.noProductsMessage) {
this.noProductsMessage.showNoProductsMessage();
}
}
}export abstract class ProductListToken {
abstract showNoProductsMessage(): void;
}In the photos above, the ProductListComponent no longer refers NoProductsMessageComponent, instead it refers a new abstract class with no implementation: ProductListToken. This reference will be retained after compilation but it is small and does not significantly impact the size of the application.
In other words, to mitigate the impact of potentially unused code, an abstract token is associated with the implementation.
This pattern is versatile and can be applied in various scenarios, particularly when working with components that utilize the ContentChild or ContentChildren decorators.
Secondary Entry Points vs Multiple libraries
Last but not least, I would like to discuss the configuration of secondary entry points, the benefits they offer, and their differentes towards to multiple libraries configuration. As you may already know, an Angular library typically follows the structure:
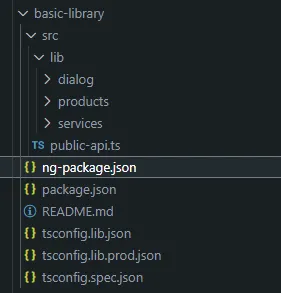
It provides a src folder with an entry point called public-api, which exports the desired functionalities to the end applications. The ng-package.json file dictates how the library behaves based on the configurations applied. For example, in this case, the schema is inherited directly from the ng-package library, the build output is exported to the dist folder.
{
  "$schema": "../../node_modules/ng-packagr/ng-package.schema.json",
  "dest": "../../dist/basic-library",
  "lib": {
    "entryFile": "src/public-api.ts"
  }
}
If the library we are working on is intended to be consumed by an undetermined number of final applications, or if we expect it to grow significantly, I strongly recommend considering two strategies before starting development: structuring the library with secondary entry points or dividing it into multiple smaller libraries. These approaches help mitigate the impact of consuming a single, large library while providing greater flexibility to the teams that will use our code. There are many considerations to be taken between these two solutions, but as a summary I would say:
- Use multiple libraries when you need clear separation of functionalities, peerDependencies, independent versioning, and reusability across projects.
- Use secondary entry points when the focus is on maintaining a cohesive package with modular access to functionalities for a single project.
The configuration of multi-library environments is a complex topic that deserves its own article. However, when it comes to secondary entry points, I believe we can cover a simple example to illustrate their benefits.
Secondary Entry Points Configuration
Let’s look at an example where we create a secondary entry point in our optimized library to consume a Material Dialog component:
{
"$schema": "../../node_modules/ng-packagr/ng-package.schema.json",
"dest": "../../dist/optimized-library",
"lib": {
"entryFile": "src/public-api.ts"
}
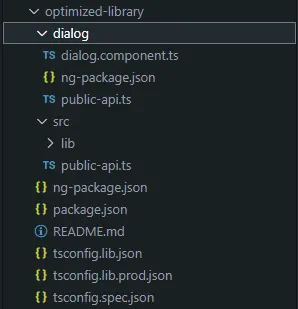
}As you can see, the structure of the library has changed slightly. Now, at the same level as the main src folder, we have declared a secondary entry point named dialog. Inside this folder, there are three new files:
- The main dialog component, which provides a dialog to the final application.
- A public-api file, which exports the desired components.
- A new ng-package.json file, which informs Angular of the new entry point for the library.
Now, all that’s left to do is compile the library to ensure everything is properly configured.
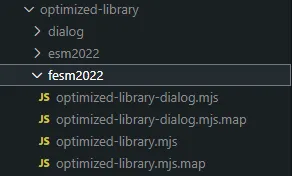
It seems like magic, right?
To use the new entry point in a new application, we will need to specify the entry point’s route URL: “optimized-library/dialog”
import { Component } from '@angular/core';
import { RouterOutlet } from '@angular/router';
import { ProductListComponent } from 'optimized-library';
import { ProductStepperComponent } from 'optimized-library';
import { DialogComponent } from 'optimized-library/dialog';
import { NoProductsMessageComponent } from 'optimized-library';

import { CommonModule } from '@angular/common';
import { MatDialog } from '@angular/material/dialog';
@Component({
  selector: 'app-root',
  standalone: true,
  imports: [RouterOutlet, CommonModule, ProductListComponent, ProductStepperComponent, NoProductsMessageComponent],
  templateUrl: './app.component.html',
  styleUrl: './app.component.scss'
})
export class AppComponent {
  title = 'app-sample';

  constructor(private dialog: MatDialog) {}

  openDialog(): void {
    this.dialog.open(DialogComponent);
  }
}
If the entry point has been properly configured, we should see the following result:
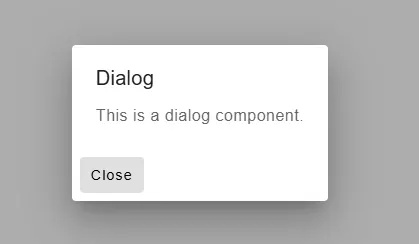
This approach will help to descentralize the logic of our library, bringing more options to the developer consumers.
Configuration of peerDependencies for Secondary Entry Points
Finally, for those who still use package.json as a secondary entry point (using package.json as the entry point), I would like to clarify one last important topic that plays a key role in deciding between a multi-library architecture and secondary entry points.
Can we configure peerDependencies for each of our secondary entry points? Or, to put it another way, do secondary entry points have the ability to install only the dependencies they specifically need?
The short answer is no. There is limited information on this topic, but during my research on configuring peerDependencies in secondary entry points, I came across different sample projects suggesting a deprecated solution that involves using nested package.json files as secondary entry points.
Using a package.json instead of an ng-package.json to configure secondary entry points can create a false impression that each entry point can manage its own peerDependencies. This is not the case, and it’s one of the reasons why nested package.json files were removed in the first place.
Peer dependencies can only be specified for the entire npm package, not for individual entry points. The nested package.json workaround functioned because Node’s module resolution system allowed it, but it did not integrate with NPM’s dependency system. Instead, it only served for module discovery.
In other words, if you want to have control of your secondary entry points peerDependencies, you should separate your library into multiple libraries. Ng-package.json is for module discovery, package.json is for NPM publishing.
Conclusion
I hope you found this article useful. At the beginning, I decided to write it because I couldn’t find much clarification on configuring peerDependencies in Secondary Entry Points, other than what is provided in the official ng-packagr GitHub repository. I hope this information reaches the right person.
On the other hand, I believe we need to write more about these topics. Angular libraries are a powerful tool for enhancing complex systems, but they remain somewhat underutilized due to their complexity and the lack of comprehensive documentation. Let’s show the Angular team that these topics are important and need to be explored in more depth!
Thank you very much for your time. I’ve attached the sample repo in case you’d like to test things for yourself or if you simply want to compare common development practices with a library-focused approach.
Cheers!
~Jesús Sanz